Coda 2 is, as you probably know by now, a surprisingly capable app, and I’m here to help you get the most of it. My promise: give this post a few minutes of your time, and you’ll learn something you didn’t know about Coda 2! (If you don’t, I’ll send you a free tweet.)
1. Open A New File in a Split
After splitting your view in via the New Split button ![]() , there are three ways to open a new file in a fresh split. You can:
, there are three ways to open a new file in a fresh split. You can:
- Option-Double-Click a file in the sidebar, pathbar, or Files tab
- Drag any file to the pathbar of your freshly opened split
- Right click a file and say “Open in Split”
Done!
Bonus Tip: Hold “Option” while clicking the New Split button to change the split direction to vertical. Or, change your default direction in the Prefs.

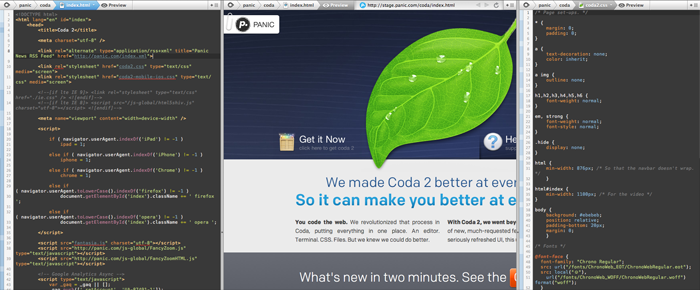
2. Use the Golden HTML + CSS + Live Preview Setup
It’s the dream view, easy as pie. First, open your HTML file. Second, click the New Split button, and choose New Untitled to get a blank split. Now, using Tip #1, open your CSS file in this new split (we like dragging files to the pathbar). Finally, click back in your first HTML split, click the New Split button again, and choose Preview.
That’s it. The best part: as you tweak your CSS, your changes will be applied live in the Preview!
3. Explore the Preferences
That reminds us — and, ok, this is a pretty lame tip — but we really recommend it: take a few minutes to check out each of the Preferences panels. You’ll likely find something you didn’t know you could do!
4. Create Site Groups
Just covering the basics: you do know that you can make Site Groups, right? To do so, simply drag a site onto another site. That’s it — just like in iOS, you can now open up the Site Group, re-arrange the members of that group, drag new items in, etc. Great for organizing jobs per client!
5. Use Text Tabs
First, did you know the tab bar was resizable? Just drag the bottom. Second, did you know that if you keep resizing the tab bar all the way down, Coda switches to space-saving Text Tabs?

6. Hide or Show Specific File Types
You don’t want to see all the hidden files littering your server. But you do want to see .htaccess files. Sure, you can turn on “Show Invisible Files”, but then it’s all or nothing, right?
Wrong! Click the Rules tab in Preferences, and you can have Coda show or hide certain types!

7. Preview in a Simulated iPhone/iPad
What happens when you change the “User Agent” in Preview to something iPhone/iPad related? Unbelievably, this happens:
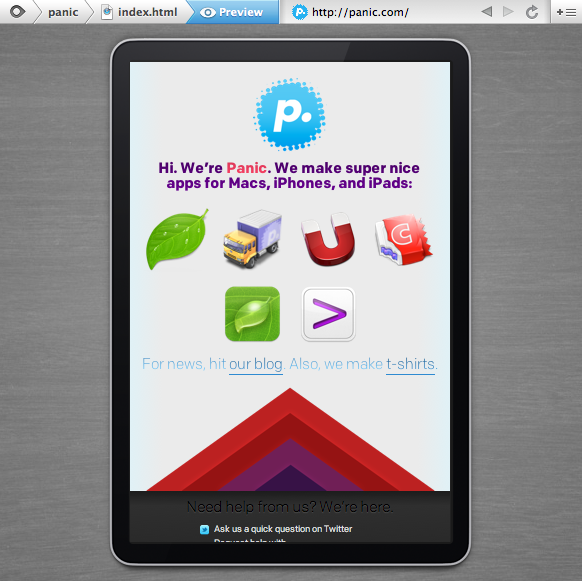
It’s just an approximation — and it’s comical if you try to use the web inspector in this view — but for mobile developers, it gives you a nice head start on layout.
To change the User Agent, just click the Preview gear menu in the bottom bar.

8. Access the Code Navigator in the Path Bar
You might already know about the Navigator, the handy Sidebar tool that lets you easily jump to pieces of your code.
But did you know that if you click the document name in the Path Bar, you can access the Navigator right then and there?
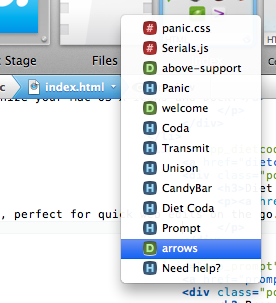
9. Add Custom Bookmarks to the Navigator
It’s fine and dandy to have your named HTML elements show up in the navigator, but what if you could add any line to it, like a bookmark? You totally can. In any syntax mode, just type a comment and prefix its contents with a !, like so:
/* !Page start */
Or, single-line-comment style:
// !Bookmark
It’ll then show up as a bookmark in the Code Navigator:

10. Quickly Jump to Line
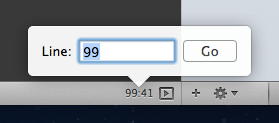
Here’s a little one: double click the line number in the bottom bar, and you get a handy jump to line pop-up. (You can also hit ⌘⇧L.)
11. Discover the Books
 Ok, so our built-in Books aren’t quite a “Secret”, but they’re so dramatically overhauled in Coda 2 that I really don’t want you to miss them.
To add a book to your tabs, click the Tab Plus, then Book. Try the HTML book — it’s an extremely efficient and fast way to quickly get reference.
Bonus Tip: our docs are available online, anywhere. Check out HTML, CSS, PHP, and Javascript.
12. Browse CSS Styles Inline
If you’re like me, you often forget a lot of CSS rules. The solution? When starting a new, blank line in a CSS style declaration, open the autocomplete menu by hitting Esc (or Option+Esc or F5) and choose the Styles pop, and you get this:
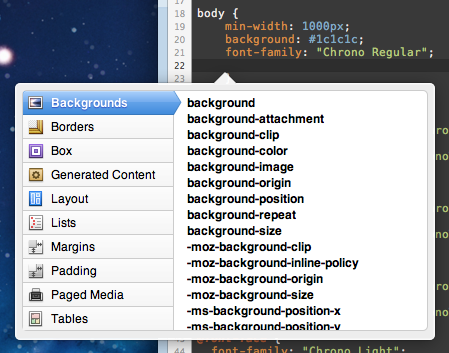
Handy!
13. Preview in a New Window
Got a huge screen? Click the Preview gear menu, and choose Preview In ▸ New Window.
14. Quickly Wrap Text in a Tag
Type some text. Select it. Then choose Text ▸ Wrap in Tag or hit ⌘< and behold: an instant tag. But it’s just a <div> tag, right? Wrong. Notice that the “div” is already selected. Now, whatever you type will be inserted into the opening and closing tag, simultaneously, automatically!

15. Blockedit Multiple Lines at Once
Quickly make changes to multiple lines at once. To do so, hold Option while dragging a text selection. Now, type within that selection. Any text is applied to all lines!
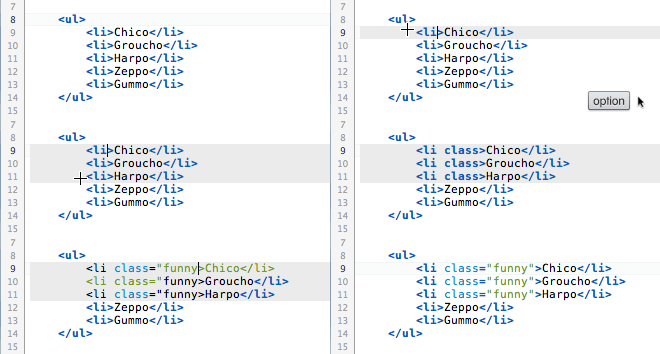
Hit “Escape” to clear your blockedit selection. In the future, there’s even more we hope to do here.
16. Use Quick Open
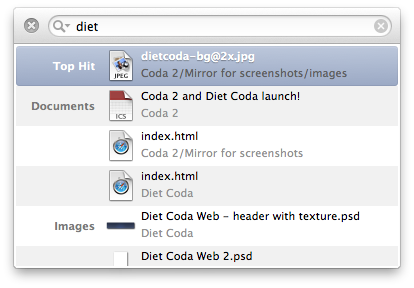
If you’re working locally, quickly open any file by clicking the Quick Open button on the left of the Path Bar. Type a few letters, and bam: there are your relevant files. You can also open this window with Control-Q. Repeat, Control-Q.
17. Discover the Text Processing Menu
Need to quickly encode accents? Remove line breaks? Don’t miss the Text ▸ Processing menu!

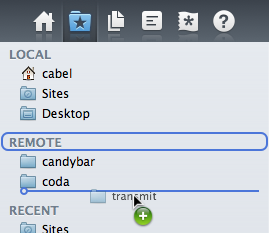
18. Drag Your Favorite Folders to Places
Have a folder you use a lot in a certain Site? Open Places in the sidebar, and just drag it in. Places acts as a per-site “favorites” for your most-used folders.
19. Quickly Jump to CSS in Preview
(Note: this tip requires Coda 2.0.2 or newer, which is coming soon.)
You can now instantly jump from Preview to a relevant piece of your CSS with a simple right click.
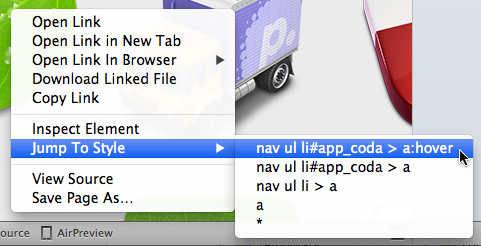
Best of all: if you don’t have the relevant CSS file open, we’ll even open it for you!
20. Bonus Tip: Customize Keyboard Shortcuts
It’s possibly one of the greatest hidden features in Mac OS X, and works for almost all apps.
First, open System Preferences ▸ Keyboard, and click Keyboard Shortcuts.
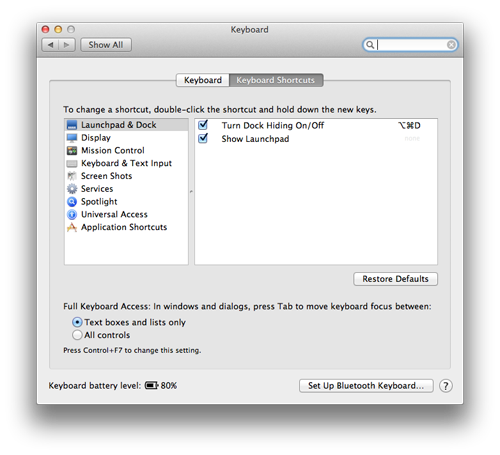
Now, select “Application Shortcuts” on the left, and click the “Plus” ![]() .
.

From the pop-up menu, choose Coda 2. Now, let’s type in “Something…”, and give it the shortcut of our choosing!
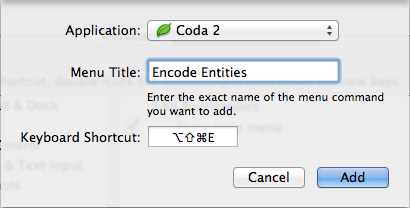
(If the menu item uses an ellipsis, it’s important that you use one here! Hit Option-Semicolon to type it.)
That’s it! Without even having to relaunch Coda, your shortcut has been added.
Enjoy the hot tips!

 It’s been two weeks since we shipped two major apps, and it’s been a whirlwind. But before I forget, if you’ll indulge me, I’d like to take a moment to say thanks to the small team of incredibly smart and talented people made Coda 2 and Diet Coda possible.
