
Today’s Mountain Lion announcement introduces an important new security feature, called Gatekeeper, in addition to the “sandboxing” feature that premiered in Lion. I’d like to talk a little bit about it, and why it’s important to all Mac users.
Malware is out of control. Almost every day I read a new article about a major security breach in a well-known organization. There is big money to be made from stolen credit card numbers and identities. End-user applications on individual computers are a prime attack vector because, even with the best tools and the best programmers, vulnerabilities sneak their way in. Trying to make applications free of vulnerabilities (while still an important goal) is to lose the overall cat-and-mouse race.
As Mac users, we’ve mostly enjoyed a life free of the worry that has followed Windows users for years. Mac OS X is pretty damn secure. But it could be more secure. As Macs enjoy increased popularity, they become a more attractive target to identity thieves and other criminals. Sooner or later, bad people ruin every nice thing. It’s an immutable law of humanity.
So, what to do about this? Code-signing, although it can’t single-handedly fix the problem forever, is a vital weapon in the fight against malware. But many folks are unclear on how it works, or how it helps. Let me try to explain in as close to plain English as I can.
An explanation of code-signing for humans
What is code-signing? Let’s start with a slightly higher-level question: what is signing? Signing is based on technology similar to encryption, so let’s discuss them both broadly.
One of the most prevalent and secure methods of encrypting or signing data is to use what’s called a “key-pair”. As the word “pair” suggests, this means there are two keys which can “unlock” the encrypted data in certain ways.
A “key” is literally just a number. But it’s a very big number, and this is important. If I asked you to guess a number between 1 and 100, you’d have a 1% chance of guessing it on your first try, and you’d be guaranteed to guess it correctly if I gave you 100 tries. But what if I asked you to guess a number between 1 and 3 trillion? That’s a bit more of a challenge.
You’ve probably heard at least in passing about encryption keys and that they have different sizes or lengths (such as 40-bit, 128-bit, or 256-bit). Just like in my number guessing example above, longer keys are harder to guess. Each additional bit that is added to a key makes it exponentially harder to guess or figure out by brute-force attempting to decrypt the data with every possible numerical key. (Is 1 the key? No. Is 2 the key? No. Is 3 the key? Is 3,426,989,662 the key? No.)
We want encryption keys to be very long so that brute-force guessing attempts would take literally thousands of years. They become an unreasonable attack vector given the current average human lifespan.
So, why two keys? In key-pair encryption, one key is called the “private key” and the other is called the “public key”.
The keeper of the private key is able to “sign” data; a process which both identifies its origin and provides reasonable proof that it has not been altered. Private keys must be guarded very carefully, so that signatures cannot be forged.
The public key, as its name suggests, may be distributed freely. In encryption, the public key can be used to encrypt data which can only be read by the owner of the corresponding private key. In other words, with my public key, you could send me a secret message that only I could read.
In signing, the public key can be used for another purpose: to verify (with an extremely high degree of mathematical probability) that a “signed” piece of data came from me. Or, to be more specific, could only have come from someone with access to my private key. Which, hopefully, is just me.
In a nutshell, that’s what signing is. Even without actually encrypting it, I can take a chunk of data, run it through a very complex mathematical process to “sign” it with my unique private key, thus generating a second chunk of data called a “signature” that could (statistically speaking) only have come from that specific combination of data chunk and my private key.
Anyone with that signature and my public key can then be almost 100% sure that data came from me, and that it was not modified by any third-party along the way. The data could’t have any virus or vulnerability injected into it, because then the signature would no longer match the data.
So, signing allows us to, with very high confidence, ensure that we are who we say we are, and that the data we produce really came from us. Code-signing, then, is simply applying that signing process to executable code like a Mac app. If I try to start up an app, the operating system can validate that the app’s signature is valid, and perhaps also that it is the signature of a known, trusted developer. If it doesn’t pass muster, the OS can refuse to run the application.
Which brings me to Gatekeeper.
The role of Gatekeeper
The iOS devices (iPhone and iPad) effectively have had a Gatekeeper built into them since their very first release. When we write an iOS app, we sign it, then send it to Apple to review. Apple can validate the signature to ensure that it hasn’t been tampered with — that it really came from us — and then it goes into the app review process.
If the app passes review, it is then signed again by Apple, and posted to the App Store. Since Apple is the only entity able to sign App Store applications, iOS will simply refuse to run any app that doesn’t have Apple’s signature — it obviously didn’t come from the App Store. (If you “jailbreak” an iOS device, this is the security check you are bypassing. You are lobotomizing iOS so that it will merrily run “unsigned” code from any source. As you can hopefully tell by now, this has both benefits in terms of flexibility and very significant risks in terms of security.)
But how to bring this level of security to Mac OS, which has always allowed unsigned code from any source to run more-or-less without restriction?
The simplest thing Apple could have done would have been to make the Mac App Store the sole source for Mac apps, in the same way the App Store is the sole source for iOS apps, shutting off every other app distribution venue in the process. While this would have immediately solved the problem, you would have seen developers’ heads bursting into flame and flying across the room in rage. Why?
Although security is a vital feature for Apple, developers, and users alike, being unable to run unsigned code cuts a lot of really great things off at the knees. You wouldn’t, for example, be able to just download and run an open source project unless it had been submitted to and reviewed by the App Store. Highly disruptive software (think Napster or BitTorrent) may have not been able to exist on the Mac platform since it would have been likely to run afoul of Apple’s App Store guidelines. Major vendors such as Adobe and Microsoft might have withdrawn their support for the platform, being unwilling to cede 30% of their revenue to App Store distribution.
So, for a while, there was a great deal of consternation among Mac developers, including this author, that this might be the route Apple would take. In recent years, Apple has shown a trend of following the most hardline possible stance that will benefit users and Apple, often at the expense of developer freedom, and gradually backing in certain affordances (push notifications, for example) as user-impacting problems became evident. So it seemed feasible that we’d wake up one day and Apple would decree that all Mac apps must be sold through the App Store.
But instead, Apple went to considerable effort and expense to find a middle ground.
Controlling Gatekeeper in Mountain Lion
In Mountain Lion, you, the user, have three options:
1. You can let anything run on your system, whether or not it is signed. This is the Mac OS of today. It’s like having a jailbroken iPhone.
2. You can allow only Mac App Store apps to run on your system. This is the most secure option, but you lose the ability to run non-App Store software, which currently includes such products as Microsoft Office and Adobe CS.
3. You can allow only Mac App Store apps or apps signed by a developer. This is the new default.
It’s this third option that is critical. As a developer, I can register for a unique ID which allows me to sign my app but does not require it be sold through the App Store. Users get the benefit of knowing the app came from a trusted source. But I retain the ability to sell my app directly to end users.
If my app were to do something nefarious, my developer ID would get revoked and that would be the end of that. My app would no longer be allowed to run (unless you specifically allowed unsigned apps). As a matter of fact, if you try to launch an unsigned or unvalidatable app on a Mac with Gatekeeper enabled, the default button is “Move To Trash”. Pretty hardcore. Kind of awesome.
It is really quite a nice compromise.
I have a personal flaw in the form of a small conspiracy theorist who lives in my head. He worried that this may have been created as just a temporary stepping stone — like Rosetta for the Intel transition, or Carbon for the OS 9 to OS X transition — and that one day, the Mac App Store-only option might still be enforced.
But I can’t find it in me to disparage this goodwill effort that Apple has undertaken to not turn every third-party developer upside-down with regard to app distribution. To me it’s a great sign that they’re aware and at some level sympathetic to our concerns, while remaining committed to a high-security experience for users.
Further cementing this feeling is the fact that we were invited to a private briefing at Apple about Gatekeeper a week before today’s announcement. Cabel was told point-blank that Apple has great respect for the third-party app community, and wants to see it continue to grow — they do not want to poison the well. I think their actions here speak even louder than their words, though.
One worrisome rift
There remains one thing that is of concern to me. Despite these great strides forward, Apple is walking a dangerous line with regard to features that are only available to App Store distributed apps. The two most prominent examples are iCloud and Notification Center. Cabel asked Apple if, thanks to Gatekeeper and Developer ID, App Store-only features would be eventually be available to signed apps that were not distributed through the App Store. There was some shuffling of feet and a “we have nothing to announce at this time”. It didn’t sound particularly optimistic.
It would be a shame if this trend continues, as it creates an artificial gulf between App Store and non-App Store apps. For example, as things stand today, we won’t be able to offer iCloud syncing in, say, Coda 2, when you purchase it directly from us. Only App Store purchasers would get that feature. Making matters worse is Apple offers us no real facility to “cross-grade” you from a direct purchase to an App Store purchase, should you change your mind.
There’s no real engineering reason that I can think of for this. It seems marketing or money-driven, and I think it’s un-Apple-like to chase the money at the expense of user experience in that manner. We hope they change their minds about that particular facet.
Moving forward
Other than that though, we think Gatekeeper is a bold new feature that should do wonders for the security of your Mac for years to come. Even though their rapid pace of development is at times difficult for us to keep up with, we are excited that Apple continues to aggressively push the envelope when it comes to keeping Mac OS X safe and secure.

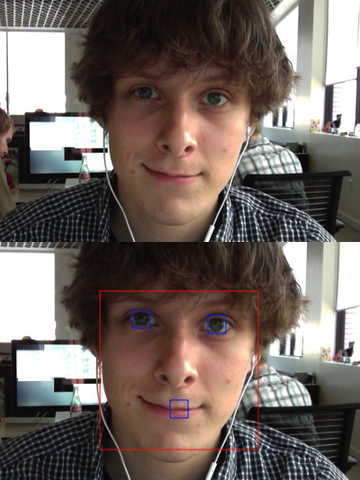 Let’s face it (sorry): face detection is cool. It was a big deal when iPhoto added Faces support — the ability to automatically tag your photos with the names of your friends and family adds a personal touch. And Photo Booth and iChat gained some awesome new effects in OS X Lion that can automatically track faces in the frame to add spinning birds and lovestruck hearts and so on. While not always productively useful, face detection is a fun technique.
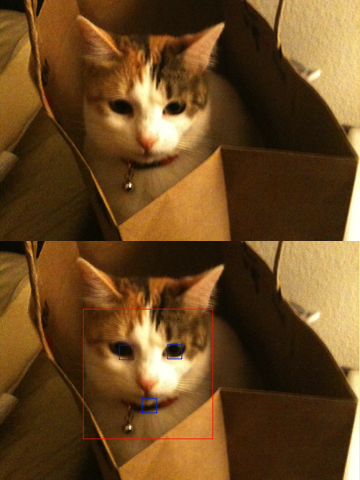

 So, we built Burnside, a Tweet-to-Email Gateway.