 Let’s face it (sorry): face detection is cool. It was a big deal when iPhoto added Faces support — the ability to automatically tag your photos with the names of your friends and family adds a personal touch. And Photo Booth and iChat gained some awesome new effects in OS X Lion that can automatically track faces in the frame to add spinning birds and lovestruck hearts and so on. While not always productively useful, face detection is a fun technique.
I’ve seen attempts at duplicating Apple’s face detection technology. (Apple is far from the first company to do it.) There are libraries on GitHub and various blog posts for doing so. But recently I realized that Apple added support for face detection in OS X Lion and iOS 5. It seemed to slip under my radar of new shiny things. Developers now have a direct link to this powerful technology on both platforms right out of the proverbial box.
Using Face Detection through Core Image
Apple’s face detection is exposed through Core Image, the super-useful image manipulation library. Two classes are important: CIDetector and CIFeature (along with its subclass, CIFaceFeature). With a little experimenting one night, I was able to get a sample app detecting faces within a static image in about 10 lines of code:
// Create the image CIImage *image = [CIImage imageWithContentsOfURL :[NSURL fileURLWithPath :@"Photo.jpg"]]; // Create the face detector CIDetector *faceDetector = [CIDetector detectorOfType:CIDetectorTypeFace context:nil options:options]; // Detect the faces NSArray *faces = [faceDetector featuresInImage :image ]; NSLog(@"%@", faces);
|
// Create the image
CIImage *image = [CIImage imageWithContentsOfURL:[NSURL fileURLWithPath:@"Photo.jpg"]];
// Create the face detector
NSDictionary *options = [NSDictionary dictionaryWithObjectsAndKeys:CIDetectorAccuracyHigh, CIDetectorAccuracy, nil];
CIDetector *faceDetector = [CIDetector detectorOfType:CIDetectorTypeFace context:nil options:options];
// Detect the faces
NSArray *faces = [faceDetector featuresInImage:image];
NSLog(@"%@", faces);
Note the dictionary of options. There is only one particularly useful key: CIDetectorAccuracy. It has two possible values: CIDetectorAccuracyLow and CIDetectorAccuracyHigh. The only difference: There seems to be additional processing performed on the image in order to detect faces, but at the cost of higher CPU usage and lower performance.
In cases where you are only apply detection to a single static image, high accuracy is best. Low accuracy becomes handy when manipulating many images at once, or applying the detector to a live video stream. You see about a 2-4x improvement in render time with low accuracy, but face tracking might pick up a couple of false-positives in the background once in a while, or be unable to detect a face at an angle away from the camera as well as high accuracy could.
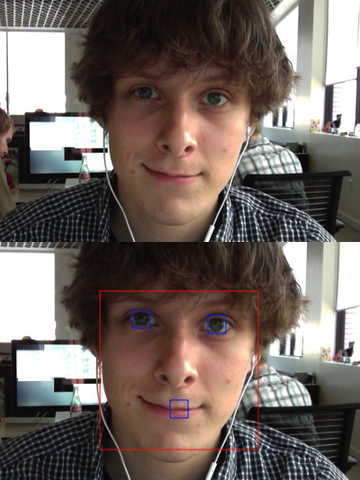
Now that we have an array of faces, we can find out some information about each face within the image. CIFaceFeature exposes several useful properties to determine the bounding rectangle of the face, as well as the position of each eye and the mouth.
Using these metrics, it’s then possible to draw on top of the image to mark each facial feature. What you get is a futuristic sci-fi face tracker ala the Fifth Element. Leeloo Dallas Multipass, anyone?
// Create an NSImage representation of the image NSImage *drawImage = [[NSImage alloc ] initWithSize :NSMakeSize ([image extent ].size.width, [image extent ].size.height )]; [drawImage addRepresentation :[NSCIImageRep imageRepWithCIImage :image ]]; [drawImage lockFocus]; // Iterate the detected faces for (CIFaceFeature *face in faces) { // Get the bounding rectangle of the face CGRect bounds = face.bounds; [[NSColor colorWithCalibratedWhite :1.0 alpha :1.0] set ]; // Get the position of facial features if (face.hasLeftEyePosition) { CGPoint leftEyePosition = face.leftEyePosition; [[NSColor colorWithCalibratedWhite :1.0 alpha :1.0] set ]; [NSBezierPath strokeRect :NSMakeRect (leftEyePosition.x - 10.0, leftEyePosition.y - 10.0, 20.0, 20.0)]; } if (face.hasRightEyePosition) { CGPoint rightEyePosition = face.rightEyePosition; [[NSColor colorWithCalibratedWhite :1.0 alpha :1.0] set ]; [NSBezierPath strokeRect :NSMakeRect (rightEyePosition.x - 10.0, rightEyePosition.y - 10.0, 20.0, 20.0)]; } if (face.hasMouthPosition) { CGPoint mouthPosition = face.mouthPosition; [[NSColor colorWithCalibratedWhite :1.0 alpha :1.0] set ]; [NSBezierPath strokeRect :NSMakeRect (mouthPosition.x - 10.0, mouthPosition.y - 10.0, 20.0, 20.0)]; } } [drawImage unlockFocus];
|
// Create an NSImage representation of the image
NSImage *drawImage = [[NSImage alloc] initWithSize:NSMakeSize([image extent].size.width, [image extent].size.height)];
[drawImage addRepresentation:[NSCIImageRep imageRepWithCIImage:image]];
[drawImage lockFocus];
// Iterate the detected faces
for (CIFaceFeature *face in faces) {
// Get the bounding rectangle of the face
CGRect bounds = face.bounds;
[[NSColor colorWithCalibratedWhite:1.0 alpha:1.0] set];
[NSBezierPath strokeRect:NSRectFromCGRect(bounds)];
// Get the position of facial features
if (face.hasLeftEyePosition) {
CGPoint leftEyePosition = face.leftEyePosition;
[[NSColor colorWithCalibratedWhite:1.0 alpha:1.0] set];
[NSBezierPath strokeRect:NSMakeRect(leftEyePosition.x - 10.0, leftEyePosition.y - 10.0, 20.0, 20.0)];
}
if (face.hasRightEyePosition) {
CGPoint rightEyePosition = face.rightEyePosition;
[[NSColor colorWithCalibratedWhite:1.0 alpha:1.0] set];
[NSBezierPath strokeRect:NSMakeRect(rightEyePosition.x - 10.0, rightEyePosition.y - 10.0, 20.0, 20.0)];
}
if (face.hasMouthPosition) {
CGPoint mouthPosition = face.mouthPosition;
[[NSColor colorWithCalibratedWhite:1.0 alpha:1.0] set];
[NSBezierPath strokeRect:NSMakeRect(mouthPosition.x - 10.0, mouthPosition.y - 10.0, 20.0, 20.0)];
}
}
[drawImage unlockFocus];
With a little more work, it’s pretty easy to apply this technique to live video from the device’s camera using AVFoundation. As you get back frames from AVFoundation, you perform face detection and modify the frame before it is displayed. But I’ll leave that as an activity for the reader. :-)
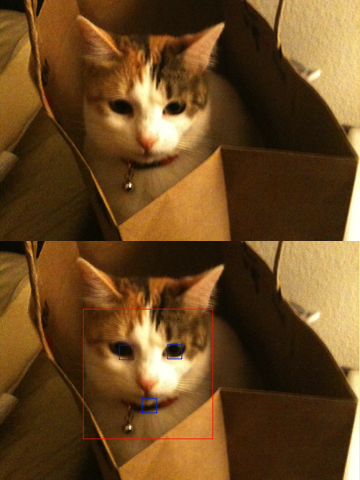
And amazingly, it even works with cats.
With a little more effort, I was able to grab the closest detected face’s region of the image, and do a simple copy-and-paste onto the other detected faces (adjusting for angle and distance, of course). Behold… Panic’s newest, most terrifying cloning technology!

Here’s a little sample app. Have fun!